

PREVENT TRUSTED SENDERS FROM BEING BLOCKED
By adding email addresses and domain names that you trust to the Safe Senders List, you instruct Outlook that messages from those sources are never to be considered as junk. If you belong to mailing lists or distribution lists, you can add these names to your Safe Recipients List.
Microsoft Outlook PC Client Instructions
To add a person to the Safe Senders List, click a message from the sender, and then click Home. In the Delete group, click Junk, and then click Never Block Sender.
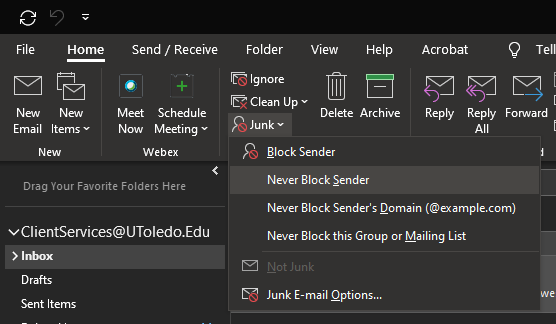
To add an email address or domain to the Safe Recipients List, click a message from the sender, and then click Home. In the Delete group, click Junk, and then click Never Block this Group or Mailing List.
If you don’t have a message from the person, you can still manually add email addresses or domains to these lists by doing the following:
-
Click Home.
-
In the Delete group, click Junk, and then click Junk Email Options.
-
Do one of the following:
-
To add safe senders, on the Safe Senders tab, click Add.
-
To add safe recipients, on the Safe Recipients tab, click Add.
-
-
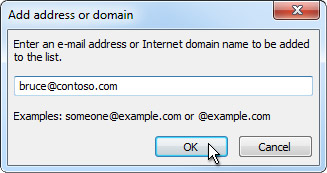
In the Enter an email address or Internet domain name to be added to the list box, enter the name or address that you want to add. For example, you can add:
-
a specific email address, such as someone@example.com
-
an Internet domain, such as @example.com, or example.com
-
-
Click OK and repeat for each entry that you want to add.
-
If you want all Contacts to be considered safe senders, select the Also trust email from my Contacts check box on the Safe Senders tab.
-
Some people whom you correspond to might not be listed in your Contacts. If you want all such people to be considered as safe senders, select the Automatically add people I email to the Safe Senders List check box.
-
If you have existing lists of safe names and addresses, you can move that information into Outlook. Click Import from File and browse for the list file that you want. To create a file that uses your current list, click Export to File and then specify where you want the new file saved.
-
To change a name on either list, click the name that you want to change and then click Edit. To remove a name, click the name that you want and then click Remove.
-
If you are using a Microsoft Exchange Server account, all of the names and email addresses that are in your organization's address book — also known as the Global Address List — are automatically considered safe.
Outlook on the Web
Note: Mac Outlook users must use outlook on the web
-
Go to office365.utoledo.edu and select the outlook application.
-
At the top of the page, select Settings
 > Mail.
 -
Under Options, select Block or allow.
-
To add an entry to Safe senders and recipients, enter the email address or domain that you want to mark as safe in the Enter a sender or domain here text box, and then press Enter or select the Add icon
 next to the text box.
-
For example, to mark all email from addresses that end in contoso.com as safe, enter contoso.com in the text box.
-
To mark a specific person as safe, enter that person's full email address. For example, to mark all messages from KatieJ@contoso.com as safe, enter KatieJ@contoso.com in the text box.
-
-
(Optional) Select the Trust email from my contacts check box to treat email from any address in your contacts folders as safe.
- Select Save to save your changes.
Remove a Sender or Domain From the Safe Senders List
-
To remove an entry from Safe senders and recipients, select the entry and select Remove.
-
Select Save to save your changes.