Registration Outreach Campaign
Easily identify students who are not yet registered for the next semester and keep track of all communications sent to students. If you have any questions, contact AcademicSuccess@utoledo.edu.
Utilize the registration cohorts to automatically filter to students who meet specific
data attributes (see full list below) and who are not registered for the future term.
Starfish will update data each night from Banner, making it easy for you to download
an accurate list of non-registered students on a daily basis.
Data Attributes Associated with Registration Cohorts
- Undergraduate Students
- Enrolled Current Term - Spring 2024
- NOT Enrolled Future Term - Fall 2024
- Excludes Applied for Graduation for Spring 2024 and Summer 2024
- Excludes Inactive Due to Graduation
- Excludes Academic Suspension
- Excludes College Credit Plus (CCP) & TPS
- Excludes Non-Degree Undergraduates (NDU)
- Excludes Collection Holds XX/XT/XH
- Excludes American Language Institute (ALI)
- Excludes EMS/EMT Program
- Excludes Program60
How to Filter to Non-Registered Students
- Access Students: Click the Starfish menu and then click "Students".
- Select the My Students Tab: There are multiple tabs featured across the top of Starfish, so ensure you are on
the My Students tab, which will individually list each student account in alphabetical
order.

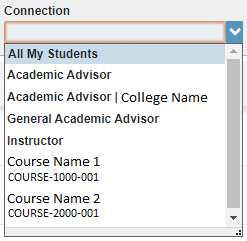
- Select your Connection: Depending on your role, you will need to select a connection to filter to a specific
caseload of students.
- Academic Advisors - Select "Academic Advisor" to filter students directly assigned to you on Banner. Instead, you may filter to students in a specific major/minor by using the organization filter. View directions here.
- Athletic Advisors - Select "Athletic Advisor" to filter to your assigned student athletes on Banner. Some students may no longer be student-athletes, so add on the attribute "Student-Athlete". View directions here.
- TRIO Advisors - Select "TRIO" to filter to all TRIO students.
- CCP/TPS Advisors - Select "Academic Advisor" to filter students directly assigned to you on Banner.
- Select Term: Select term as "Active".

- Select Cohorts: Select both cohorts listed under the cohort section "Campaign - Registration", which will automatically
apply all student data attributes. Once selected, click into the open space of Starfish to apply the cohort.
If you are a CCP/TPS advisor, instead select the cohorts listed under the section "Campaign Registration CCP/TPS".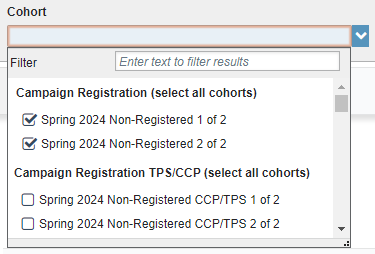
- Download List: Utilize the download feature to obtain the list of students into an excel file, which
will have the student's email addresses to send a blind carbon copy email.
Prior to outreaching to a student, review the various tabs within their student folder to become aware of their current registration status.
Review Tracking Tab
Check to see if there are any active registration codes, indicating a student's registration decision for the next semester.
Review Notes Tab
Review to see if there are any notes added regarding registration outreach or other pertinent information (Do Not Contact, Res Life, etc.).
Review Overview Tab
Review other applicable attributes and active holds.
How to Review Student Folder Prior to Outreach
- Access Students: Click the Starfish menu and then click "Students".
- Select the My Students Tab: There are multiple tabs featured across the top of Starfish, so ensure you are on
the My Students tab, which will individually list each student account in alphabetical
order.

- Reapply Filters: Fitler to all the non-registered students by applying registration filters (review directions here).
- Access Student Folder: Click on the student's name to access their student folder.

- View Tracking Tab: Once in the student folder, click on “Tracking” from the side menu.

Review list of tracking items to see if the student has any active registration codes flags, indicating the student's registration decision.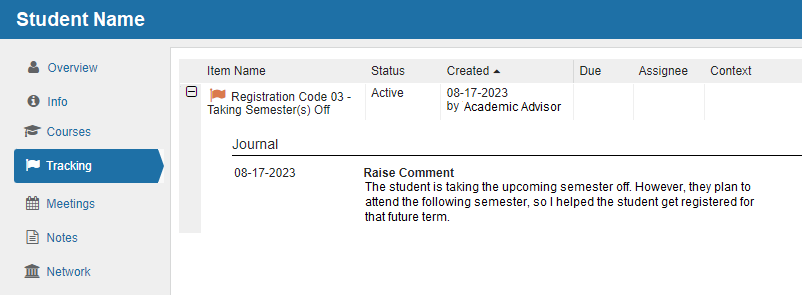
- View Notes Tab: Once in the student folder, click on “Notes” from the side menu.

Review list of notes to see if the student has been outreached to recently regarding registration for the next semester. Specifically look for the note type "2024 Spring Registration Outreach".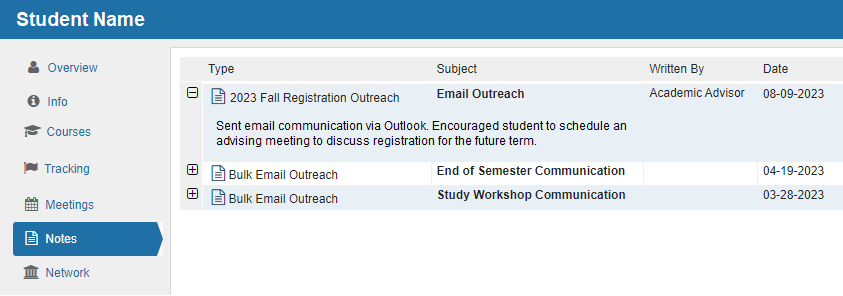
- View Overview Tab: Once in the student folder, click on “Overview” from the side menu.

Review list of attributes on student account to see if the student has any active holds or other data you may need to take into consideration prior to outreach.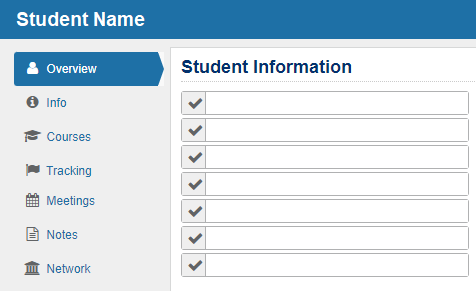
- Outreach to Student: Once you have reviewed the student folder, outreach to the student to encourage them to register for the next semester.
Outreach directly to student to encourage them to register for the next semester.
Document this outreach attempt as a note, so others can view the outreach attempt
and avoid duplicating efforts.
Wrong Contact Information
If you encounter a wrong number or a full voicemail, raise the coordinating flag on
the student in Starfish. This will automatically email the student with the steps
to update their university contact information and allow other Starfish users to view
the flag, who may be attempting to contact the student as well.
How to Document a Note for Registration Outreach
- Access Students: Click the Starfish menu and then click "Students".
- Select the My Students Tab: There are multiple tabs featured across the top of Starfish, so ensure you are on
the My Students tab, which will individually list each student account in alphabetical
order.

- Reapply Filters: Filter to all the non-registered students you contacted by reapplying the same registration
filters (view directions here). If you only communicated to one student, use the search feature to locate their
individual student account.
- Select Students: Once you locate the student(s), check mark the box next to their name. If you need
to select all displayed students, check mark the box at the top of the column.

- Click Note Button: Add a Note to all selected students by clicking the Note button.
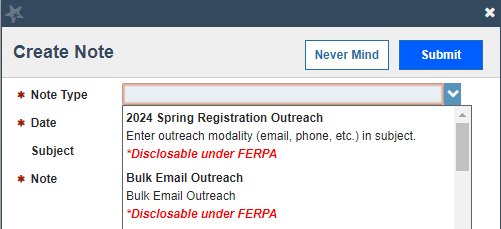
- Select Note Type: In the new window, a drop-down list will appear with all available Note Types, which
helps to categorize various outreach campaigns. For the purposes of registration,
select "2024 Spring Registration Outreach".
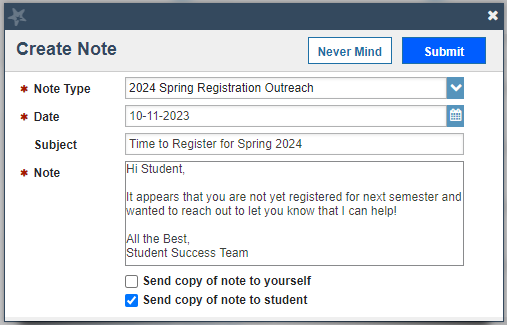
- Enter Date: Enter the date that you conducted the outreach.

- Enter Subject: Enter the subject of the Note, which should be the modality of the outreach. Examples
include: "Email Message", "Phone Call & Left Voicemail", "Text Message", etc.

- Enter Note: Enter the details of the note, which could include the messaging sent to the student.

- Send Copy of Note: There is the option for you to send a copy of the note to yourself or the student.
If you were to send a copy of the note to the student, you would need to structure
the note in the format of an email message directed toward the student. Enter the
subject as the subject of the email message and then enter the body of the email message
in the note section. Ensure to include a greeting, your message, and your signature.
If you have multiple students selected, do not personalize the message.
- Note Sharing: Allow other Starfish users to be able to view this note in Starfish, we recommend
leaving the note as Shared. If you select Private, only the creator of the note and
the Starfish Administrators can view the note.
- Click Submit to save changes.
If a student responds to your registration outreach and indicates their registration decision, raise a registration code flag on that student in order to notify others that the student has responded. Some registration codes will send an email message to the student with next steps for them to complete, depending on the registration code. View message templates here.
How to Raise a Registration Code
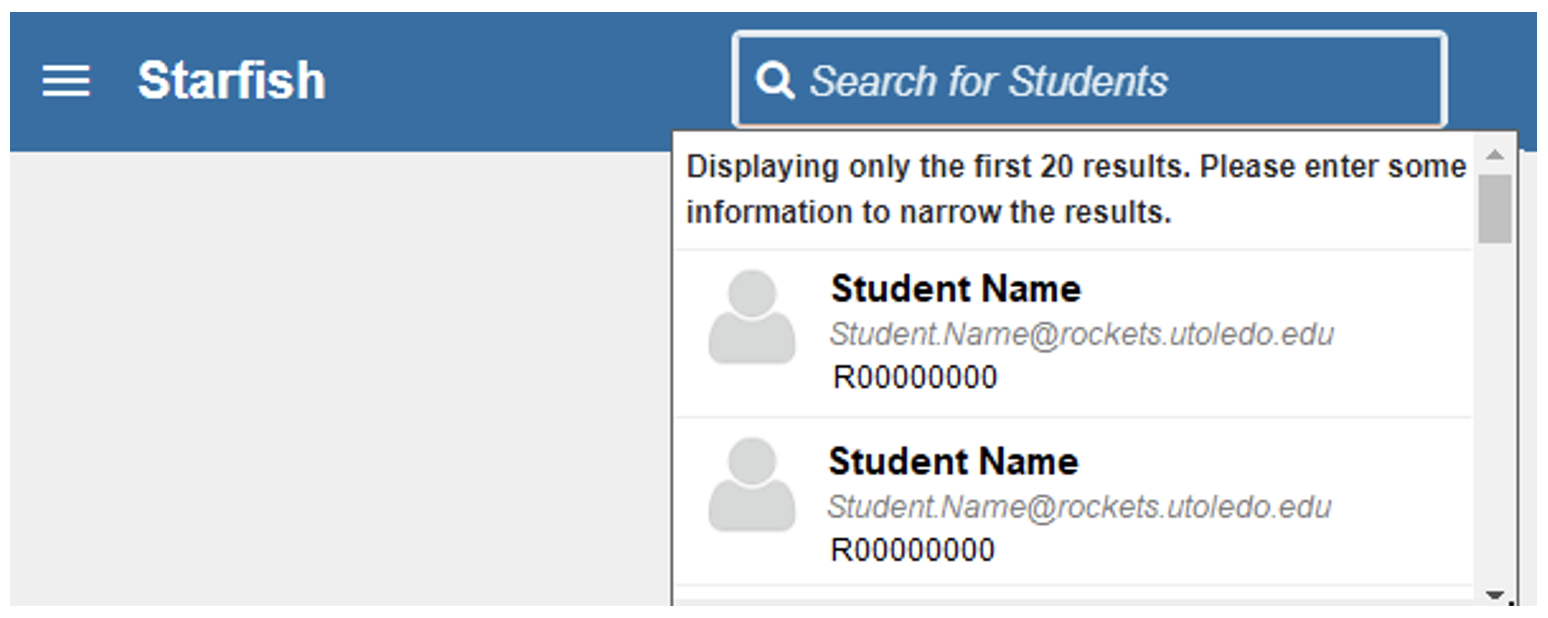
- Search for Student: Once in Starfish, use the search bar (top-right corner) to locate the student. Click
on their account to access their Starfish folder.
- Select the Tracking Item Type: Click the flag tracking item icon.
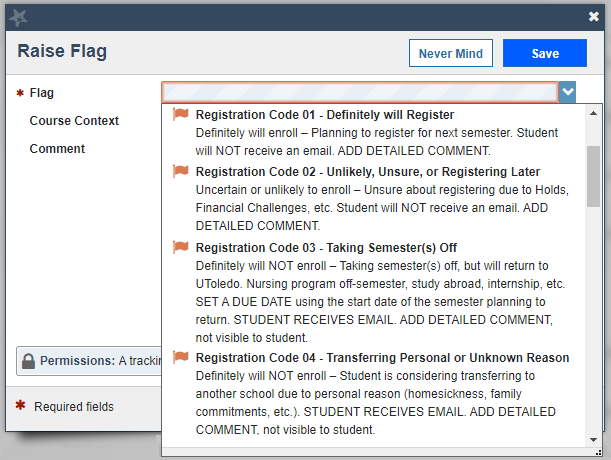
- Select Registration Code: In the new window, a drop-down list of tracking items will display, select the specific
registration code you would like to raise on the student. Review the descriptions
under the tracking items to see what circumstances qualify for this item to be raised
on a student.
- Comment: Add a detailed comment with the reason you are raising this specific registration
code on the student. The comments are not viewable by students, but they are visible
by other Starfish users.
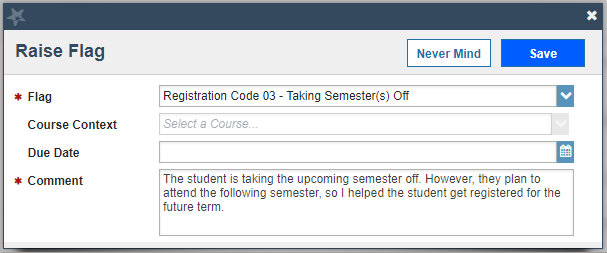
- Click Save to raise the tracking item on the student.
Available Registration Codes
Registration Code 01
Definitely will register. Student is planning to register for next semester, but just hasn't gotten to it yet or they need to meet with their academic advisor.
Registration Code 02
Unlikely, unsure, or registering at a later time. Student is unsure about registering due to holds, financial challenges, etc.
Registration Code 03
Taking semester(s) off. Student will not register for next semester, but they plan to return to UToledo the following semester or beyond. Nursing program off-semester, study abroad, internship, etc.
When raising this code in Starfish, SET A DUE DATE using the start date of the semester planning to return. Example: student plans to return Fall 2023, set date as 08/01/2023.
Registration Code 04
Transferring: Personal or Unknown Reason. Student will not register because they are considering transferring to another school due to personal reason (homesickness, family commitments, etc.).
Registration Code 05
Transferring: Academic Reason/Major Not Offered. Student will not register because they are considering transferring to another school due to an academic reason (GPA, etc.) or UToledo does not have student’s desired major (entering trades, etc.).
Registration Code 06
Transferring: Financial Reason. Student will not register because they are considering transferring to another school due to financial situation (loss of scholarship, etc.).
Registration Code 07
Not Returning: Personal or Unknown Reason. Student will not register due to personal reason (homesickness, family commitments, etc.).
Registration Code 08
Not Returning: Academic Reason/Major Not Offered. Student will not register due to an academic reason (GPA, etc.) or UToledo does not have student’s desired major (entering trades, etc.).
Registration Code 09
Not Returning: Financial Reason. Student will not register due to financial situation (collection balance too large, etc.).
Registration Code 10
Military Obligation. Student will not register due to enlisting in the military, scheduled for deployment, active duty, etc.
Registration Code 11
CCP Student Not Returning. Student will not register because they are currently a CCP student who is graduating high school and not planning to attend UToledo.
Registration Code 12
Graduation. Student will not register because they are graduating this semester.
Registration Code 13
Academic Suspension. Student will not register because they are academically suspended or dismissed for the next semester.
Registration Code 14
New Student Not Attending. Student will not register because they submitted the "New Student Not Attending" form.
Registration Code 15
New Student Deferring Enrollment. Student will not register because they plan to defer their enrollment to the following semester.
In Starfish, if you identify a student with a tracking item related to registration, the student may have received an email and/or text communication associated with that tracking item. View the message templates below.
Registration Spring 2024 Communication
From: StudentSuccess@utoledo.edu
Reply-To: StudentSuccess@utoledo.edu
Subject: Register Now for Spring 2024
Hello [Student First Name],
We hope your fall semester is going well so far!
We are reaching out because we noticed that you are not yet registered for Spring 2024, and wanted to offer some assistance. Specifically, we would like to encourage you
to complete the following steps below to get registered for Spring 2024.
- Resolve Holds: Check your student account for any active holds, which may prevent you from registering.
View directions for how to address holds.
- Connect with Academic Advisor: Contact your academic advisor (view assigned advisor in Starfish) in order to review your academic plan of study, obtain course recommendations, and
make sure you are on track for graduation. View directions for how to contact your college advising office.
- Major Changes or Career Exploration: If you are considering changing majors and know your intended major, view directions for how to change your major. If you are not sure of your intended major, we recommend connecting with a career consultant in Career Services and utilizing the career exploration resources. View major and career exploration resources.
If you do not plan to register for Spring 2024, please respond with your plans for spring so that you are not further contacted
about spring registration.
Best,
Student Success Team
The University of Toledo


